
How Long Does Professional Cabinet Painting Take?
Most homeowners planning a cabinet painting project have the same question before they schedule anything: how long is my kitchen going to be out of commission? It is a fair thing to want to know before committing.
Professional cabinet painting is not a single-day job. It is a multi-stage process where each phase builds directly on the one before it. The timeline reflects what the work actually requires — not how quickly it can be pushed through.
Here is a clear look at what happens at each stage of the process, how long professional cabinet painting takes from start to finish, and what to expect for kitchen access while the work is underway.
What Happens at Each Stage of the Process
The cabinet painting process follows a defined sequence. Each stage has a specific job, and the time it takes is determined by what that job requires. Skipping or compressing any stage does not save time — it creates problems the next stage has to absorb.
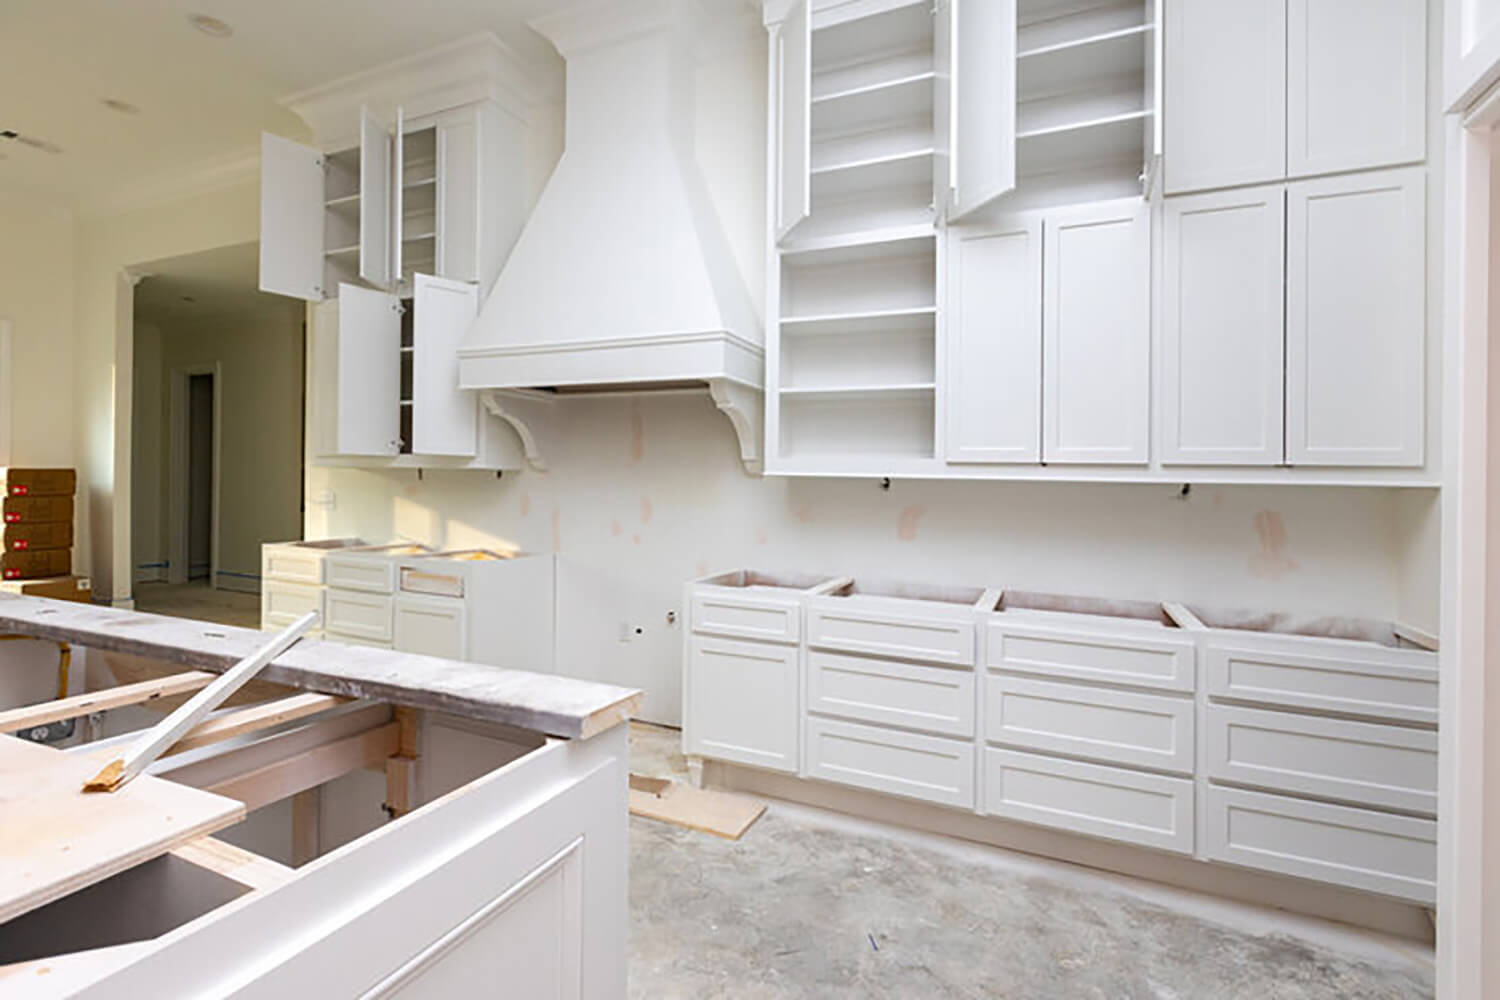
Cabinet Removal and Labeling
Before any surface work begins, every cabinet door, drawer front, and piece of hardware comes off. Painting cabinets in place produces uneven results. The only way to achieve a clean, consistent finish is to work on each component separately.
Labeling is part of this step, not an afterthought. Each door and drawer front gets marked before it leaves the hinge so it returns to exactly the same position at reassembly. A cabinet that goes back in the wrong place creates alignment problems that are tedious to fix after the fact.
Kitchen size is what determines how long this stage runs. More cabinets means more doors, more hardware, and more labeling. A smaller kitchen with a standard upper and lower run moves quickly. A kitchen with any of the following takes longer:
- Island cabinets
- Pantry cabinets
- Built-ins or specialty storage
Expect this stage to run a half day to a full day depending on cabinet count.
Cleaning, Sanding, and Surface Preparation
Cleaning, Sanding, and Surface Preparation
Kitchen cabinets accumulate grease, cooking residue, and airborne film over years of use. That buildup does not just look bad. It actively prevents primer and paint from bonding to the surface. Every cabinet goes through a thorough degreasing before any coating is applied.
Sanding follows. The goal is not to strip the existing finish. It is to scuff the surface just enough that primer has something to grip. All surfaces get sanded — doors, drawer fronts, and frames — until the finish is dull and uniform.
Cabinet condition is the biggest variable at this stage. Surfaces that are in good shape move through prep efficiently. Surfaces with any of the following add time before coatings can begin:
- Heavy grease or residue buildup
- Previous paint failures or peeling
- Damage that needs to be addressed before painting
Plan for a half day to a full day here depending on cabinet count and surface condition.
Priming
Primer is not a preliminary coat of paint. It is a separate product with a specific job: seal the surface, create a uniform base, and block anything underneath from bleeding through the finish coats. Tannins from wood, stains, and inconsistencies in the existing surface all get addressed at this stage.
Professional cabinet painters apply primer by sprayer. Spray application produces a smoother, more even base than brushing or rolling, and that base directly affects how the topcoats look and perform.
The application itself moves relatively quickly. What takes time is the drying window that follows. Primer needs to dry fully before topcoats go on. Applying paint over primer that has not dried compromises adhesion, and adhesion problems do not show up immediately — they show up months later when the finish starts to fail. Depending on the product used and conditions on site, drying adds a half day or more to this stage.
Painting and Spraying
Topcoats are not applied in the kitchen. Cabinet doors and drawer fronts are moved to a controlled spray environment — a dedicated spray area, garage, or staging space — where conditions can be managed. This is how professional cabinet painting achieves a factory-smooth finish. Spraying in place introduces too many variables to produce that result consistently.
Multiple coats are standard. The number of coats depends on several factors:
- The degree of color change from existing to new
- The paint product being used
- What the surface needs to achieve full, even coverage
A significant color shift typically requires more coats. Each additional coat adds drying time between applications. That time is not optional. It is what allows each coat to cure to the correct level before the next one goes on.
This stage generally runs one to two days depending on coat count and drying conditions.
Drying and Curing
Drying and curing are two different things, and the distinction matters for how homeowners manage their kitchen after the project wraps.
Paint dries to the touch in hours. Curing is a longer process — the coating continuing to harden and reach its full strength over days and weeks. Depending on the product, full cure takes anywhere from one to four weeks after installation.
Cabinets are reinstalled before they are fully cured. This is normal. A professionally applied finish handles careful reinstallation before it reaches full hardness. What homeowners should know is that the finish is still developing strength in the weeks that follow. During that window:
- Avoid abrasive cleaners and harsh chemicals
- Keep heavy contact with cabinet surfaces to a minimum
- Wipe spills gently rather than scrubbing
Treating the finish carefully during that period is what allows it to reach its full durability.
Reassembly
With painting and curing time accounted for in the production schedule, the final stage is putting everything back. Doors and drawer fronts are rehung using the labeling system established at removal. Hardware is reinstalled. The professional checks alignment on each door and makes any minor adjustments needed before the job is called complete.
This stage typically runs a half day to a full day depending on kitchen size. When it is done, the kitchen is back to normal use. The finish will continue to cure over the following weeks, but the kitchen is fully functional from this point forward.
How Long Professional Cabinet Painting Takes From Start to Finish
With all six stages accounted for, a typical professional cabinet painting project runs three to five days of active work. That range is not vague — it reflects real differences in project scope.
At the shorter end of the range, a project looks like this:
- Smaller kitchen with a standard cabinet count
- Surfaces in good condition requiring minimal prep
- Straightforward color with no dramatic shift from existing to new
- Fewer coats needed to achieve full coverage
At the longer end, one or more of the following is usually true:
- Larger kitchen with higher cabinet count, island cabinets, or a pantry
- Surfaces with buildup, previous paint issues, or repairs needed before coating
- Significant color change requiring additional coats for even coverage
- Paint product with longer required drying windows between applications
It is also worth noting what the three to five day range does not include. Full cure continues after the crew has finished and the kitchen is back in use. The active project days represent the work — the finish developing its full hardness happens in the weeks that follow.
The timeline is not a negotiation. A project at the shorter end takes less time because the scope is smaller, not because anything was skipped. A project at the longer end takes more time because the work requires it. Either way, the stages are the same.
What to Expect for Kitchen Access During the Project
For most of the project, the kitchen is accessible but incomplete. Cabinet doors and drawer fronts are removed early on and stay in the spray environment until painting and drying are finished. The cabinet boxes remain in place throughout. The kitchen is usable — but it is open, and it will look that way for the majority of the timeline.
Here is a realistic picture of what each phase looks like from the homeowner’s side:
- Removal day: The kitchen loses its doors and drawer fronts. Shelves and cabinet interiors are accessible and usable, but the kitchen is visibly mid-project from this point forward.
- Prep and priming: Work is happening in the kitchen on the cabinet frames. Access is limited during active work hours. The kitchen is otherwise usable in a reduced capacity.
- Painting days: Most of the active work shifts to the spray environment off-site or in a staging area. The kitchen itself is relatively undisturbed, but doors and drawer fronts are still out.
- Reassembly day: Everything comes back. This is the most disruptive day after removal because the professional is actively working throughout the kitchen to rehang and align every door and drawer front.
Cooking is possible during most of the project in a limited way. The prep and reassembly days tend to be the most disruptive to normal kitchen use. For the days in between, the kitchen functions — it just does not have doors.
Planning ahead makes the timeline easier to manage. Having a secondary prep area, a microwave setup, or a plan for meals during the active project days reduces the friction considerably.
Once reassembly is complete and the professional has checked alignment, the kitchen is back to normal use. The finish will continue to cure over the weeks that follow, but day-to-day kitchen activity can resume immediately.
The Timeline Exists to Protect the Finish
Every stage in the process exists for a reason. Cleaning creates the surface that sanding needs. Sanding creates the surface that primer needs. Primer creates the surface that topcoats need. Each stage depends on the one before it being done correctly. That is not a coincidence — it is how a durable finish is built.
When any stage is compressed or skipped, the effects do not show up immediately. A cabinet that was not degreased thoroughly will look fine the day it is painted. The adhesion failure comes months later. A topcoat applied before primer has fully dried will look fine at first. The peeling starts when the finish is under regular use.
A professional who understands the process does not look for ways to shorten the timeline. They protect it because that is what produces a finish that lasts. Knowing what to look for when choosing a painter in Santa Rosa helps ensure the person you hire actually follows through on that.
If you are ready to move forward, our team is happy to walk you through what a cabinet painting project would look like for your kitchen and provide an estimate for the work. Visit our cabinet painting page to learn more or get in touch to schedule a consultation.

Leave a Reply